
Creating UITableViews programmatically is quite easy once you get the hang of UITableViews and become familiar with the various methods in UITableViewDataSource and UITableViewDelegate. The downside is there is not much documentation on constructing them programmatically.
Building static table views without the aide of storyboards is similar to programmatically building any other interface... create UITableCell variables on the Controller. Then reference the variables in the UITableViewDataSource and UITableViewDelegate methods.
This example will create a basic form-type static table:
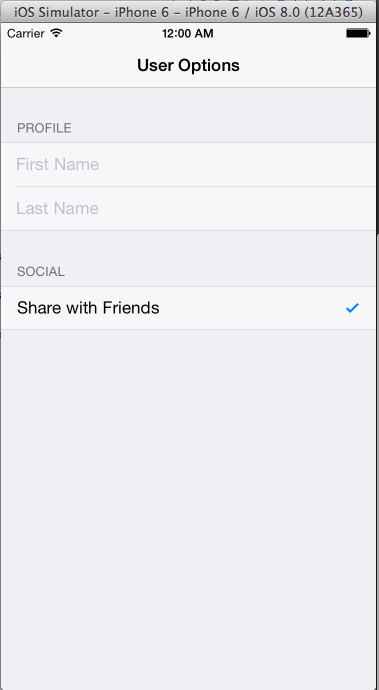
This example has two sections. The first section contains information about a user's first name and last name. There are two rows in the first section.
The second section contains a single row that stores a value indicating if they want to share information.
For a full working example in both Objective-C and Swift, refer to the Github Repository:
https://github.com/bmancini55/iOSExamples-StaticCells
Starters
The first thing you need to ensure is that the UITableView uses the UITableViewStyleGrouped style. Where you define your UITableViewController is where you will specify this value using initWithStyle. In the example, this is defined in the AppDelegate.
Next, in the actual TableViewController, define the View variables. These will be used by the various UITableViewDataSource and UITableViewDelegate methods.
Also define UITextField variables that will exist inside the UITableViewCell for the first name and last name rows.
Objective-C
@interface TableViewController()

@property (strong, nonatomic) UITableViewCell *firstNameCell;
@property (strong, nonatomic) UITableViewCell *lastNameCell;
@property (strong, nonatomic) UITableViewCell *shareCell;

@property (strong, nonatomic) UITextField *firstNameText;
@property (strong, nonatomic) UITextField *lastNameText;

@end
Swift
var firstNameCell: UITableViewCell = UITableViewCell()
var lastNameCell: UITableViewCell = UITableViewCell()
var shareCell: UITableViewCell = UITableViewCell()

var firstNameText: UITextField = UITextField()
var lastNameText: UITextField = UITextField()
You end up with 5 variables stored by your Controller.
loadView
Inside the loadView method for the controller is where you can will build your cells programmatically.
You simply reference the variables you have defined and build out the cell as you would like it to look.
Objective-C
- (void)loadView
{
    [super loadView];

    // set the title
    self.title = @"User Options";

    // construct first name cell, section 0, row 0
    self.firstNameCell = [[UITableViewCell alloc] init];
    self.firstNameCell.backgroundColor = [UIColor colorWithRed:1.0f green:1.0f blue:1.0f alpha:0.5f];
    self.firstNameText = [[UITextField alloc]initWithFrame:CGRectInset(self.firstNameCell.contentView.bounds, 15, 0)];
    self.firstNameText.placeholder = @"First Name";
    [self.firstNameCell addSubview:self.firstNameText];

    // construct last name cell, section 0, row 1
    self.lastNameCell = [[UITableViewCell alloc] init];
    self.lastNameCell.backgroundColor = [UIColor colorWithRed:1.0f green:1.0f blue:1.0f alpha:0.5f];
    self.lastNameText = [[UITextField alloc]initWithFrame:CGRectInset(self.lastNameCell.contentView.bounds, 15, 0)];
    self.lastNameText.placeholder = @"Last Name";
    [self.lastNameCell addSubview:self.lastNameText];

    // construct share cell, section 1, row 00
    self.shareCell = [[UITableViewCell alloc]init];
    self.shareCell.textLabel.text = @"Share with Friends";
    self.shareCell.backgroundColor = [UIColor colorWithRed:1.0f green:1.0f blue:1.0f alpha:0.5f];
    self.shareCell.accessoryType = UITableViewCellAccessoryCheckmark;
}
Swift
override func loadView() {
    super.loadView()

    // set the title
    self.title = "User Options"

    // construct first name cell, section 0, row 0
    self.firstNameCell.backgroundColor = UIColor(red: 1.0, green: 1.0, blue: 1.0, alpha: 0.5)
    self.firstNameText = UITextField(frame: CGRectInset(self.firstNameCell.contentView.bounds, 15, 0))
    self.firstNameText.placeholder = "First Name"
    self.firstNameCell.addSubview(self.firstNameText)

    // construct last name cell, section 0, row 1
    self.lastNameCell.backgroundColor = UIColor(red: 1.0, green: 1.0, blue: 1.0, alpha: 0.5)
    self.lastNameText = UITextField(frame: CGRectInset(self.lastNameCell.contentView.bounds, 15, 0))
    self.lastNameText.placeholder = "Last Name"
    self.lastNameCell.addSubview(self.lastNameText)

    // construct share cell, section 1, row 0
    self.shareCell.textLabel?.text = "Share with Friends"
    self.shareCell.backgroundColor = UIColor(red: 1.0, green: 1.0, blue: 1.0, alpha: 0.5)
    self.shareCell.accessoryType = UITableViewCellAccessoryType.Checkmark
}
The loadView method starts by setting the title for the controller.
It then constructs the first name cell, firstNameCell. It then creates the UITextField for the first name cell, firstNameText.
It uses the bounds of the firstNameCell to set the frame for the firstNameText. Finally, it will add the firstNameText to the firstNameCell.
You follow an identical pattern for the lastNameCell and lastNameText variables.
Finally, you construct shareCell for storing the users desired to share information with friends. This cell has an accessoryType applied to it.
The above code is fairly straight-forward. As you develop Cocoa programmatically, building out controls becomes second-nature.
UITableViewDataSource Protocol
The next part is interfacing with the UITableViewDataSource protocol to determine how the sections and rows get rendered.
In this example, there are two sections. You can use sections to logically group different rows in your table. On our controller you implement the numberOfSectionsInTableView method to define the number of sections.
Objective-C
// Return the number of sections
- (NSInteger)numberOfSectionsInTableView:(UITableView *)tableView
{
    return 2;
}
Swift
// Return the number of sections
override func numberOfSectionsInTableView(tableView: UITableView) -> Int {
    return 2
}
Next, you want to determine the number of rows in each section. You can do this by defining the tableView:numberOfRowsInSection method. This method takes a section number and returns an Integer representing how many rows are in the section.
Objective-C
// Return the number of rows for each section in your static table
- (NSInteger)tableView:(UITableView *)tableView numberOfRowsInSection:(NSInteger)section
{
    switch(section)
    {
        case 0:  return 2;  // section 0 has 2 rows
        case 1:  return 1;  // section 1 has 1 row
        default: return 0;
    };
}
Swift
// Return the number of rows for each section in your static table
override func tableView(tableView: UITableView, numberOfRowsInSection section: Int) -> Int {
    switch(section) {
    case 0: return 2    // section 0 has 2 rows
    case 1: return 1    // section 1 has 1 row
    default: fatalError("Unknown number of sections")
    }
}
The above code is no that different than generating tables from data. Where the code differs from is in the tableView:cellForRowAtIndexPath method.
Traditionally, you would dequeue a cell from the reuse container. If it had not been constructed, you would build the cell. Once you had a cell constructed, you would populate the cell with the data you needed.
In our case, you already constructed all the cells during loadView, so now you only have to use these cells!
Objective-C
// Return the row for the corresponding section and row
- (UITableViewCell *)tableView:(UITableView *)tableView cellForRowAtIndexPath:(NSIndexPath *)indexPath
{
    switch(indexPath.section)
    {
        case 0:
        switch(indexPath.row)
        {
            case 0: return self.firstNameCell;  // section 0, row 0 is the first name
            case 1: return self.lastNameCell;   // section 0, row 1 is the last name
        }
        case 1:
        switch(indexPath.row)
        {
            case 0: return self.shareCell;      // section 1, row 0 is the share option
        }
    }
    return nil;
}
Swift
// Return the row for the corresponding section and row
override func tableView(tableView: UITableView, cellForRowAtIndexPath indexPath: NSIndexPath) -> UITableViewCell {
    switch(indexPath.section) {
    case 0:
        switch(indexPath.row) {
        case 0: return self.firstNameCell   // section 0, row 0 is the first name
        case 1: return self.lastNameCell    // section 0, row 1 is the last name
        default: fatalError("Unknown row in section 0")
        }
    case 1:
        switch(indexPath.row) {
        case 0: return self.shareCell       // section 1, row 0 is the share option
        default: fatalError("Unknown row in section 1")
        }
    default: fatalError("Unknown section")
    }
}
All you are doing is returning a specific cell variable when a particular section and row requests a cell.
UITableViewDelegate Protocol
You can customize your UITableView further by using the methods in the UITableViewDelegate. You can interact with your cells by interacting with cell and field variables as needed.
You can also modify the title for each section with titleForHeaderInSection or build completely custom headers using viewForHeaderInSection and heightForHeaderInSection.
Objective-C
// Customize the section headings for each section
- (NSString *)tableView:(UITableView *)tableView titleForHeaderInSection:(NSInteger)section
{
    switch(section)
    {
        case 0: return @"Profile";
        case 1: return @"Social";
    }
    return nil;
}
Swift
// Customize the section headings for each section
override func tableView(tableView: UITableView, titleForHeaderInSection section: Int) -> String? {
    switch(section) {
    case 0: return "Profile"
    case 1: return "Social"
    default: fatalError("Unknown section")
    }
}
Working Example
For a full working example in both Objective-C and Swift, refer to the Github Repository:
https://github.com/bmancini55/iOSExamples-StaticCells